The_Chronicle_GER wrote:Okay - so I have to pose first and then make the weight-painting?
I tried that already as well (somehow that slipped through in my opening post), but it seems I did something wrong...
EDIT: I think I found my fail here: The weight-mapping is kinda off. Also, some bones didn't connect well with the mesh. (I made a 2nd attempt after seeing your post, Anx.) And yet, it doesn't work off as it's supposed to be. Should I upload this attempt as well or is the first one enough to fix it? If yes, can you fix it, please?
If you can't fix it, can you please provide me instead the bone weights I need to set up that it works?
Right, pose it first and then make the weight-painting. You can assign weights to the vertices of the Object by painting on it with weight brushes, using the
Brush Tools with blending mode "Add" or "Subtract".
And,
if you have a complex mesh (or intersecting meshes, like the legs/boots), it is sometimes not easy to paint on all vertices in Weight Paint Mode. Suppose you only want to paint on a small area of the Mesh and keep the rest untouched. This is where
selection masking comes into play.
And,
you can
Assign (or Remove) weights to active vertex group (bones) by switching from the "Weight Paint" mode to the "Edit Mode".
That is the key to solve the wrong deformations. Watch this video
https://www.youtube.com/watch?v=OE91YPK0WYw on time 0:38
Note also the "Remove" button, to the right of the "Assign" button.

Sure, I can fix it:


but after you have already made such a great progress in rigging and skinning, you should finish it yourself.

It is always a good idea to made at first a proper armature.

vs

however, you can fix also a wrong weight painting on a wrong armature.
Basically, your work has two types of errors:
- surface objects which do not follow the bone


- Surface objects that follow the wrong bone


How to fix?
Armor part near the elbow:
- Pose the (left) arm slightly.

- Enter the Paint mode and select the elbow vertex group (bone). Use the brush with "Add"

- Select vertex group after vertex group to find a bone which influence the mesh (and should not do it)

- use The "Sub" mode

Do the same ("Sub") for the hair part

Left Boots follow the left leg AND the right leg:
- Enter the "Edit" mode and select some of the vertices of the
left boot

- Use Ctr+J (select joined vertices) to select he whole left boot.
Select the bones (vertex groups) of the
right bones and press "
remove".
Select the bone of the
left leg and press "
assign"

- do it again, for the other boot part


- Now, the left boot deforme correct:

- The same workflow for the right boot:

 Weld legs (removed "double" vertices)
  http://image.noelshack.com/fichiers/201 ... vertex.jpg
- Select some "faces" of the left leg

- "Split" this faces
- "Assign" faces to the vertex group "left thigh"
- "Remove" faces from the vertex group "right thigh"

- Same workflow for the right leg. OR, use now the "Weight Paint" mode "Sub" and "Add"


Profit

BTW:
A professional modeler make the skinning using quads (not tris)
https://thundercloud-studio.com/tutoria ... uman-head/
ÔÇô Use quad as much as possible and use triangle when necessary, triangle are not recommanded but it doesnt harm
having a few
triangle to terminate our edge loop to advoid adding extra unnecessary loops , but keep in mind the fact that
the model might not deform nicely when animated and smoothed but it will save us unnecessary edge loops and faces.

Review our topology to check whether our character will have a good deform when doing expression or not.
This topology should be improved

ÔÇô Avoid poles ( where vertex share more than 4 edges, it ÔÇÿs impossible to avoid pole in our model
but we should hide these at those area that are less seen in the model because the areas that have
pole are not smoothed properly )
Beautiful, Yet Friendly
 What is a good topology? Figure A or figure B?
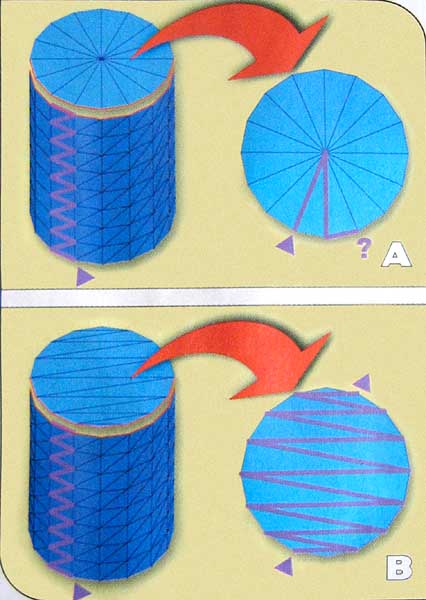

Think of
https://www.youtube.com/watch?v=CnIOsWAPJAU
/\
/ \
----
|\/|
|/\|
----
If you (your graphic card) can paint the topology in one stroke, it's a good (efficient) topology.
